It contains description of issues people have faced when installing Butler SOS, as well as solutions to them.
If in doubt on how to install Butler SOS, please consider Docker (or Kubernetes if available) as the first alternative.
Why? Several reasons:
Very quick to get started. Usually it takes just a few minutes to set up a Butler SOS instance in Docker.
Using Docker is a great way to test new tools without having to install the tool on one of your actual servers. If you decide the tool in question is not for you - just delete the Docker container. Your servers remain 100% the same as before the test.
The previous point is true not only for Butler SOS, but also its companion tools InfluxDB, Prometheus, Grafana and MQTT (via for example the Mosquitto MQTT broker). You can run all of these tools in their own Docker containers, and not install a single piece of new, native applications during your evaluation of Butler SOS.
Make use of your existing Docker runtime environments, or use those offered by Amazon, Google, Microsoft etc.
Benefit from the comprehensive tools ecosystem (monitoring, deployment etc) that is available for Docker.
Updating Butler SOS to the latest version (assuming no config file changes are needed for that particular upgrade) is as easy as stopping the container, doing a “docker pull ptarmiganlabs/butler-sos:latest”, and finally starting the container again.
If Docker is not an option, the pre-built, stand-alone binaries for Windows, Linux and macOS are good options.
They offer a download-configure-execute approach to running Butler SOS.
This will be the easiest way to use Butler SOS if you are not familiar with Docker.
But even with the above recommendations, Butler SOS can be deployed in lots of different configurations.
It is therefore difficult to give precise instructions that will work everywhere, for everyone. Especially the fact that Butler SOS uses certificates to authenticate with Sense is a complicating factor. Certificates are (when correctly used) great for securing systems, but they can also cause headaches.
First we must recognize that Sense uses self signed certificates. This is fine, and as long as you work on a server where Sense Enterprise is installed, that server will have the Sense-provided certificates and Certificate Authority (CA) installed.
This means that the easiest option for getting Butler SOS up and running is usually to install it on one of your Sense servers.
That said, it is probably better system design to run Butler SOS (and maybe other members of the Butler family) on their own server, maybe using some flavour of Linux (lower cost compared to Windows). Windows servers work equally well though.
In this case you might want to consider exporting the Sense CA certificate from one of your Sense servers, and then install it on the Linux server.
This should technically not be needed for Butler SOS to work correctly - as long as you specify the correct root.pem file in the Butler SOS config file, you should be ok.
If you specify an incorrect root CA certificate file in the clientCertCA config option, you will get an error like this:
2018-05-23T20:36:44.393Z - error: Error: Error: unable to verify the first certificate
at TLSSocket.<anonymous> (_tls_wrap.js:1105:38) at emitNone (events.js:106:13) at TLSSocket.emit (events.js:208:7) at TLSSocket._finishInit (_tls_wrap.js:639:8) at TLSWrap.ssl.onhandshakedone (_tls_wrap.js:469:38)2018-05-23T20:36:49.164Z - verbose: Event started: Query log db
2018-05-23T20:36:49.180Z - verbose: Event started: Statistics collection
A general note on host names is also relevant.
If you specify a server name of “myserver.company.com” while exporting certificates from the QMC, you should use that same server name in the Butler SOS config file. Failing to do so will (most likely) result in an error:
2018-05-23T19:51:03.087Z - error: Error: Error: Hostname/IP doesn't match certificate's altnames: "Host: serveralias.company.net. is not in the cert's altnames: DNS:myserver.company.com" at Object.checkServerIdentity (tls.js:223:17) at TLSSocket.<anonymous> (_tls_wrap.js:1111:29) at emitNone (events.js:106:13) at TLSSocket.emit (events.js:208:7) at TLSSocket._finishInit (_tls_wrap.js:639:8) at TLSWrap.ssl.onhandshakedone (_tls_wrap.js:469:38)2018-05-23T19:51:07.701Z - verbose: Event started: Statistics collection
1 - Choosing a platform - what are the options?
You can run Butler SOS on several platforms, each with their own pros and cons. This section should help you decide which platform is right for you.
As Butler SOS is written in Node.js, the tool in theory runs on all platforms where Node.js is available.
It is also available as a Docker image.
Docker is by far the preferred way of running Butler SOS, mainly because it gives you a very nice, production grade (stable, scalable, monitorable etc) execution environment. If you are really serious about scalability and stability you could even run Butler SOS in Kubernetes.
Other platforms can be used too, of course - let’s look at the pros and cons of some of the more commonly used platforms:
Platform
Pros
Cons
Docker
- Easy to set up Butler SOS in Docker - Easy to test new versions of Butler SOS - Use existing Docker infrastructure - Monitoring, restarts etc built into Docker - Runs on low cost hardware and OSs
- Docker environment needed (if not already available). Setting up and running Docker is not hard, but does require somewhat other skills than those needed to run a Sense environment
- Butler SOS can run on same server as Qlik Sense, saving hardware/server costs - Pre-built, standalone binaries available
- Running Butler SOS natively on the Sense server is a potential risk (usually a good idea to isolate systems/services to their own servers/environments whenever possible) - More difficult (compared to Docker) to achieve a production grade setup (auto restarts etc)
Linux
- No cost for operating system (at least not for most Linux versions) - Runs on low cost hardware - Pre-built, standalone binaries available
- More difficult (compared to Docker) to achieve a production grade setup (auto restarts etc)
Mac OS
- For development, if you want to extend or modify Butler SOS - Signed, pre-built, standalone binaries available
- Not a server grade operating system, i.e. not for production use
Windows (desktop)
- For development, if you want to extend or modify Butler SOS
- Not a server grade operating system, i.e. not for production use
2 - Native app
How to install Butler SOS as a Node.js application.
Selecting an OS
While Qlik Sense Enterprise is a Windows only system, Butler SOS should be able to run on any OS where Node.js is available.
Butler SOS has been successfully used as a native Node.js app - during development and production - on Windows, Linux (Debian and Ubuntu tested) and mac OS.
Prerequisites
What
Comment
Qlik Sense Enterprise on Windows
Mandatory. Butler SOS is developed with Qlik Sense Enterprise on Windows (QSEoW) in mind. Butler SOS is simply not intended to work with Sense Desktop or Sense cloud.
Node.js
Mandatory. Butler SOS is written in Node - which is thus a firm requirement.
MQTT broker
Optional. MQTT is used for outbound pub-sub messaging. Butler SOS assumes a working MQTT broker is available, the IP of which is defined in the Butler SOS config file. Mosquitto is a great open source broker. It requires very little hardware to run, even the smallest (usually free) Amazon/Google/Microsoft/… instance is enough, if you want a dedicated MQTT server. If you don’t care about the pubsub features of Butler SOS, you don’t need a MQTT broker. In this case you can disable the MQTT features in the config YAML file.
Use at least one of InfluxDB and Prometheus. An open source database for real-time information, used to store metrics around Butler’s own memory usage over time (if this feature is enabled). At this point more metrics and events are sent to InfluxDB, compared to Prometheus.
Use at least one of InfluxDB and Prometheus. The de-facto standard open source tool for metrics gathering in large-scale systems, including Kubernetes. A bit more complex to set up and configure compared to InfluxDB, but also more focused on providing observability features.
Optional. The de-facto open source standard for showing real-time metrics. In order to visualise Sense real-time metrics in Grafana you must enable at least one of InfluxDB or Prometheus.
2.1 - Windows
Running Butler SOS in Windows.
Installation
There are two options: Run Butler SOS as a standalone binary or as a Node.js app.
The first is by far easier to set up and maintain and thus recommended.
Using the pre-built, standalone app
The pre-build binaries are available from the releases page.
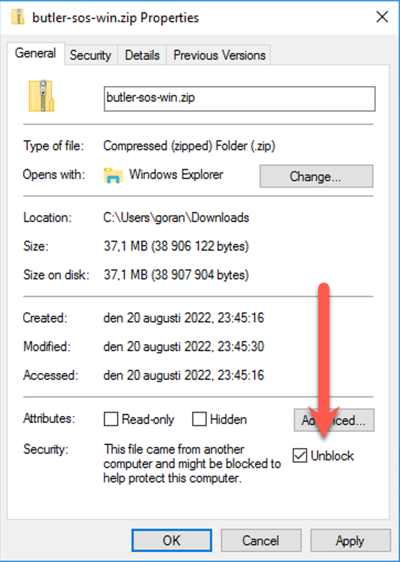
Download the Windows binary
“Unblock” the downloaded zip file
Right-click the zip file
Select “properties”
Mark the “Unblock” check box in the lower right part of the properties window
Click the “Apply” button, then “Ok” to close the properties window
Unzip the zip file
Move the extracted butler-sos.exe file to desired location, for example d:\tools\butler-sos
Use nssm or similar tool to install Butler SOS as a Windows service
Unblocking the Butler SOS zip file on Windows Server
Using Node.js
In this scenario you will use the Butler SOS source code together with the standard Node.js runtime libraries.
The result is the same as with the stand-alone binaries, you just have to do more of the work yourself.
This is usually not preferred, but if you want to add new features to (or modify existing ones) Butler SOS, this option is for you
2. Select a directory from which Butler SOS will be run
This can be pretty much anywhere, in this example d:\tools\butler-sos will be used.
3. Get Butler SOS
Get the desired Butler SOS version and extract it into the directory above.
Get the latest available version unless you have a really good reason to use an older version.
New features are added, bugs fixed and security updates are applied in each version - it’s simply a good idea to use the latest version.
Do not just clone the Butler SOS repository as that will give you the latest development version, which may not yet be fully tested and packaged.
The exception is of course if you want to contribute to Butler SOS development - then forking and cloning the repository is the right thing to do.
4. Install Node.js dependencies
From d:\tools\butler-sos\src, run npm i to install the various Node.js modules used by Butler SOS. Depending on your server configuration you may get some warnings about (for example) Python not being installed, these can usually be ignored.
Configuration
The configuration file is used the same way as when Butler SOS runs on Docker, with one exception:
The path to the certificates used to authenticate with Sense must be specified in the config file. With Docker the certificate path is always the same, but with Windows you need to specify where the certificate files are located.
For example, if the certificate files exported from Sense are stored in d:\secrets\sensecert, the config file would look like this when used on Windows:
...# Certificates to use when querying Sense for healthcheck data. Get these from the Certificate Export in QMC.cert:clientCert:d:\secrets\sensecert\client.pemclientCertKey:d:\secrets\sensecert\client_key.pemclientCertCA:d:\secrets\sensecert\root.pem
Stayin’ alive
A tool like Butler SOS should of course start automatically when the server it runs on is restarted. This can be achieved in at least a couple of ways:
By far the best option is to turn Butler SOS into a Windows service. That way it will be started on server boot, restarted if it fails etc. There are various tools for doing this, with NSSM being a very good one. Butler SOS has been installed in lots of Sense environments this way.
You can also use a Node process monitor such as PM2 to monitor the Butler SOS process, and restart it if it for some reason crashes. PM2 is not entirely easy to use on Windows though.
2.2 - Linux and Mac OS
Running Butler SOS in Linux and Mac OS. Installation and configuration.
Installation
There are two options: Run Butler SOS as a standalone binary or as a Node.js app.
The first is by far easier to set up and maintain and thus recommended.
Using the pre-built, standalone app
The pre-build binaries are available from the releases page.
Download the Linux/macOS binary
Move the extracted butler-sos file to desired location.
Use the process monitor of choice (see below) to make sure Butler SOS is always running
Using Node.js
This scenario is identical to the Windows scenario, please refer to that page for details. Keep in mind that the format of file systems paths differ between Windows and Linux/Mac OS.
A Node process monitor can be used on Linux or Mac OS too.
Tools like PM2 in fact usually work better on Linux/Mac OS than on Windows.
You can probably also use Linux’ standard service layer to start Butler SOS, that has not been tested though.
3 - Docker
Running Butler SOS in Docker. Installation and configuration.
Tip
Butler SOS Docker images are automatically built for several architectures:
amd64: This is by far the most common platform - your typical Intel based server use amd64.
arm64: Arm servers are now available from most cloud providers and offer very competitive price/performance. Apple’s new M1 CPUs also use arm64, as does the newer Raspberry Pi models.
arm/v7: An older Arm architecture found in previous-gen Raspberry Pis, for example.
Docker is great in that it runs on many different platforms.
This means that as long as the Docker runtime environment is installed, you can run Butler SOS on your Mac laptop, on a Linux server or on a Windows server.
Or in a Kubernetes cluster to get enterprise grade process monitoring of Butler SOS.
Installation
Docker runtime
Installing Docker is beyond the scope of this document, but there are plenty of online tutorials covering this.
Butler SOS installation and configuration
When using Docker there is no installation in the traditional sense.
Instead we (in this case) use a docker-compose file to define how Butler SOS should be executed within a Docker container. There are also other ways to start Docker containers, but docker-compose is usually a good and robust starting point.
Configuration of Butler specific settings is then done using Butler’s own JSON/YAML config file.
Install & configure - walkthrough
Create a directory for Butler SOS. Config files and logs will be stored here.
This example uses macOS but the commands will be very similar on Linux.
Docker on Windows is another story - it’s there and works great, but not always identical to Linux/macOS.
Copy docker-compose.yml from the GitHub repository to the Butler SOS directory that was created above. The directory where the docker-compose file is stored is the ‘root’ directory of Butler SOS - everything else is relative to this directory.
Adapt the docker-compose file as needed (usually no changes are needed if you want to run the latest version of Butler SOS).
Copy the YAML config file from the GitHub repository into the ./config directory, rename it to production.yaml (or something else, as long as it matches the NODE_ENV environment variable set in the docker-compose.yml file) and edit it as needed. Note that for the Docker setup the path to certificates (as specified in the YAML config file) should be /nodeapp/config/certificate/ (this is the Docker container’s internal path to the certificate directory).
Edit the config file above as needed, with respect to your local Sense environment, folder paths etc. The provided template file has reasonable default settings where possible, but there are also a number of paths, passwords etc that must be configured.
Export certificates from the QMC in Qlik Sense Enterprise, place them in the ./config/certificate directory (i.e. in a subdirectory to the directory where the docker-compose file is stored). The certificates can in theory be placed anywhere, as long as they are made available to the Docker container via a volume mount in the docker-compose.yaml file (e.g. - "./config:/nodeapp/config").
Let’s do this one step at a time.
Here we will bring up a single container with Butler SOS in it.
The Butler SOS config file is called production.yaml.
First, what files are there?
➜ butler-sos-docker ls -la
total 8drwxr-xr-x 5 goran staff 160 Aug 21 19:08 .
drwxr-xr-x 3 goran staff 96 Aug 21 18:49 ..
drwxr-xr-x 4 goran staff 128 Aug 21 19:08 config
-rw-r--r-- 1 goran staff 1505 Aug 21 19:01 docker-compose.yml
drwxr-xr-x 2 goran staff 64 Aug 21 18:49 log
➜ butler-sos-docker
➜ butler-sos-docker ls -la config
total 48drwxr-xr-x 4 goran staff 128 Aug 21 19:08 .
drwxr-xr-x 5 goran staff 160 Aug 21 19:08 ..
drwxr-xr-x 5 goran staff 160 Aug 21 19:08 certificate
-rw-r--r-- 1 goran staff 21903 Aug 21 19:08 production.yaml
➜ butler-sos-docker
➜ butler-sos-docker ls -la config/certificate
total 24drwxr-xr-x 5 goran staff 160 Aug 21 19:08 .
drwxr-xr-x 4 goran staff 128 Aug 21 19:08 ..
-rw-r--r--@ 1 goran staff 1170 Aug 21 19:06 client.pem
-rw-r--r--@ 1 goran staff 1704 Aug 21 19:06 client_key.pem
-rw-r--r--@ 1 goran staff 1224 Aug 21 19:06 root.pem
➜ butler-sos-docker
What does the docker-compose.yml file look like?
➜ butler-sos-docker cat docker-compose.yml
# docker-compose.ymlversion: "3.3"services:
butler-sos:
image: ptarmiganlabs/butler-sos:latest
container_name: butler-sos
restart: always
volumes:
# Make config file and log files accessible outside of container - "./config:/nodeapp/config" - "./log:/nodeapp/log" environment:
- "NODE_ENV=production"# Means that Butler SOS will read config data from production.yaml logging:
driver: "json-file" options:
max-file: "5" max-size: "5m" networks:
- senseops
networks:
senseops:
driver: bridge
➜ butler-sos-docker
Ok, all good. Let’s start the container using docker-compose (the exact output will depend on what version of Butler SOS you are using and what features you have enabled in its YAML config file).
➜ butler-sos-docker docker-compose up
Creating network "butler-sos-docker_senseops" with driver "bridge"Creating butler-sos ... doneAttaching to butler-sos
butler-sos | 2022-08-23T03:45:28.754Z info: CONFIG: Influxdb enabled: truebutler-sos | 2022-08-23T03:45:28.757Z info: CONFIG: Influxdb host IP: 192.168.100.20
butler-sos | 2022-08-23T03:45:28.757Z info: CONFIG: Influxdb host port: 8086butler-sos | 2022-08-23T03:45:28.758Z info: CONFIG: Influxdb db name: senseops
butler-sos | 2022-08-23T03:45:29.003Z info: CONFIG: Found InfluxDB database: senseops
butler-sos | 2022-08-23T03:45:29.219Z info: --------------------------------------
butler-sos | 2022-08-23T03:45:29.220Z info: Starting Butler SOS
butler-sos | 2022-08-23T03:45:29.220Z info: Log level: verbose
butler-sos | 2022-08-23T03:45:29.221Z info: App version: 9.2.0
butler-sos | 2022-08-23T03:45:29.221Z info: Instance ID : 87b978019ae........
butler-sos | 2022-08-23T03:45:29.222Z info:
butler-sos | 2022-08-23T03:45:29.223Z info: Node version : v18.7.0
butler-sos | 2022-08-23T03:45:29.223Z info: Architecture : x64
butler-sos | 2022-08-23T03:45:29.224Z info: Platform : linux
butler-sos | 2022-08-23T03:45:29.224Z info: Release : 11butler-sos | 2022-08-23T03:45:29.224Z info: Distro : Debian GNU/Linux
butler-sos | 2022-08-23T03:45:29.224Z info: Codename : bullseye
butler-sos | 2022-08-23T03:45:29.224Z info: Virtual : falsebutler-sos | 2022-08-23T03:45:29.225Z info: Processors : 4butler-sos | 2022-08-23T03:45:29.225Z info: Physical cores : 4butler-sos | 2022-08-23T03:45:29.225Z info: Cores : 4butler-sos | 2022-08-23T03:45:29.226Z info: Docker arch. : undefined
butler-sos | 2022-08-23T03:45:29.226Z info: Total memory : 6233055232butler-sos | 2022-08-23T03:45:29.226Z info: Standalone app : falsebutler-sos | 2022-08-23T03:45:29.226Z info: --------------------------------------
butler-sos | 2022-08-23T03:45:29.226Z info: Client cert: /nodeapp/config/certificate/client.pem
butler-sos | 2022-08-23T03:45:29.227Z info: Client cert key: /nodeapp/config/certificate/client_key.pem
butler-sos | 2022-08-23T03:45:29.227Z info: CA cert: /nodeapp/config/certificate/root.pem
butler-sos | 2022-08-23T03:45:29.250Z verbose: MAIN: Anonymous telemetry reporting has been set up.
butler-sos | 2022-08-23T03:45:29.252Z verbose: MAIN: Starting Docker healthcheck server...
butler-sos | 2022-08-23T03:45:29.257Z info: USER EVENT: UDP server listening on 0.0.0.0:9997
butler-sos | 2022-08-23T03:45:29.257Z info: LOG EVENT: UDP server listening on 0.0.0.0:9996
butler-sos | 2022-08-23T03:45:29.290Z info: MAIN: Started Docker healthcheck server on port 12398.
butler-sos | 2022-08-23T03:45:29.290Z info: MAIN: Starting Prometheus Butler SOS endpoint on 0.0.0.0:9842.
butler-sos | 2022-08-23T03:45:29.291Z verbose: PROM: Setting up Prometheus client for server: sense1
butler-sos | 2022-08-23T03:45:29.292Z verbose: PROM: Setting up Prometheus client for server: sense2
butler-sos | 2022-08-23T03:45:29.310Z info: PROM: Prometheus Butler SOS metrics server now listening on port 9842butler-sos | 2022-08-23T03:45:29.311Z info: PROM: Prometheus Node.js metrics server now listening on port 0.0.0.0:9001
butler-sos | 2022-08-23T03:45:30.911Z verbose: --------------------------------
butler-sos | 2022-08-23T03:45:30.911Z verbose: Iteration # 1, Uptime: 0 months, 0 days, 0 hours, 0 minutes, 2.005 seconds, Heap used 33.26 MB of total heap 58.39 MB. External (off-heap): 3.57 MB. Memory allocated to process: 92.45 MB.butler-sos | 2022-08-23T03:45:31.051Z verbose: UPTIME NEW RELIC: Sent Butler SOS memory usage data to New Relic account 123456789("Ptarmigan Labs NR account")butler-sos | 2022-08-23T03:45:31.269Z verbose: MEMORY USAGE INFLUXDB: Sent Butler SOS memory usage data to InfluxDB
...
Once everything everything looks good you can stop the containers (ctrl-C), then start them again in daemon mode (i.e. running unattended in the background):
➜ butler-sos-docker docker-compose up -d
Starting butler-sos ... done➜ butler-sos-docker
Setting the log level to info in the config file will reduce log output.
The Docker container implements Docker healthchecks, which means you can run docker ps to see whether the container is healthy or not (assuming Docker healthchecks are enabled in the config file, of course):
➜  butler-sos-docker docker ps
CONTAINER ID   IMAGE                             COMMAND                  CREATED              STATUS                    PORTS     NAMES
9d2253511a24   ptarmiganlabs/butler-sos:latest   "docker-entrypoint.s…"   About a minute ago   Up 17 seconds (healthy)             butler-sos
➜  butler-sos-docker
4 - InfluxDB & Grafana
How to use Butler SOS with InfluxDB and Grafana using Docker.
Warning
Butler SOS supports InfluxDB version 1.x and 2x.
InfluxDB v3.x is not yet supported.
If you already have InfluxDB and/or Grafana running you can skip this section.
Running in Docker using docker-compose
The easiest way to get started is to run these tools in Docker containers, controlled by docker-compose files.
Running them under Kubernetes will give you a whole other level of fault tolerance, scalability etc - but this also requires much more when it comes to Kubernetes skills. Use the setup that’s relevant to your use case.
You can use a single docker-compose file for Butler SOS, InfluxDB and Grafana - or separate docker-compose files for each tool.
The advantage of using a single docker-compose file is that the entire stack of tools will be launched in unison. You can create dependencies between the tools if needed etc - very convenient.
On the other hand, having separate docker-compose files makes it easier to restart (or upgrade or in other ways change) a single service without affecting other services.
Full stack docker-compose file
Let’s start Butler SOS, InfluxDB and Grafana from a single docker-compose_fullstack_influxdb.yml file:
➜ butler-sos-docker cat docker-compose_fullstack_influxdb.yml
# docker-compose_fullstack_influxdb.ymlversion: "3.3"services:
butler-sos:
image: ptarmiganlabs/butler-sos:latest
container_name: butler-sos
restart: always
volumes:
# Make config file and log files accessible outside of container - "./config:/nodeapp/config" - "./log:/nodeapp/log" environment:
- "NODE_ENV=production_influxdb"# Means that Butler SOS will read config data from production_influxdb.yaml logging:
driver: "json-file" options:
max-file: "5" max-size: "5m" networks:
- senseops
influxdb:
image: influxdb:1.8.10
container_name: influxdb
restart: always
volumes:
- ./influxdb/data:/var/lib/influxdb # Mount for influxdb data directory - ./influxdb/config/:/etc/influxdb/ # Mount for influxdb configuration ports:
# The API for InfluxDB is served on port 8086 - "8086:8086" - "8082:8082" environment:
# Disable usage reporting - "INFLUXDB_REPORTING_DISABLED=true" networks:
- senseops
grafana:
image: grafana/grafana:latest
container_name: grafana
restart: always
ports:
- "3000:3000" volumes:
- ./grafana/data:/var/lib/grafana
networks:
- senseops
networks:
senseops:
driver: bridge
➜ butler-sos-docker
Assuming you’ve already completed the setup of Butler SOS, the result of running the docker-compose_fullstack_influxdb.yml file above is something like this:
➜ butler-sos-docker docker-compose -f docker-compose_fullstack_influxdb.yml up
Creating network "butler-sos-docker_senseops" with driver "bridge"Creating influxdb ... doneCreating butler-sos ... doneCreating grafana ... doneAttaching to butler-sos, grafana, influxdb
...
...
grafana |logger=grafanaStorageLogger t=2022-08-21T18:13:42.76538465Z level=info msg="storage starting"grafana |logger=ngalert t=2022-08-21T18:13:42.780004463Z level=info msg="warming cache for startup"grafana |logger=http.server t=2022-08-21T18:13:42.796364325Z level=info msg="HTTP Server Listen"address=[::]:3000 protocol=http subUrl=socket=grafana |logger=ngalert.multiorg.alertmanager t=2022-08-21T18:13:42.807894344Z level=info msg="starting MultiOrg Alertmanager"butler-sos | 2022-08-21T18:13:42.908Z info: CONFIG: Influxdb enabled: truebutler-sos | 2022-08-21T18:13:42.911Z info: CONFIG: Influxdb host IP: influxdb
butler-sos | 2022-08-21T18:13:42.912Z info: CONFIG: Influxdb host port: 8086butler-sos | 2022-08-21T18:13:42.912Z info: CONFIG: Influxdb db name: senseops
influxdb |ts=2022-08-21T18:13:43.139047Z lvl=info msg="Executing query"log_id=0cSPbmJG000 service=query query="SHOW DATABASES"influxdb |[httpd] 172.24.0.2 - - [21/Aug/2022:18:13:43 +0000]"GET /query?p=&q=show+databases&u= HTTP/1.1"20084"-""-" fd854ac5-217c-11ed-8001-0242ac180003 1084influxdb |ts=2022-08-21T18:13:43.169398Z lvl=info msg="Executing query"log_id=0cSPbmJG000 service=query query="CREATE DATABASE senseops"influxdb |[httpd] 172.24.0.2 - - [21/Aug/2022:18:13:43 +0000]"POST /query?p=&q=create+database+%22senseops%22&u= HTTP/1.1 "20033"-""-" fd89e529-217c-11ed-8002-0242ac180003 2940butler-sos | 2022-08-21T18:13:43.177Z info: CONFIG: Created new InfluxDB database: senseops
influxdb |ts=2022-08-21T18:13:43.219945Z lvl=info msg="Executing query"log_id=0cSPbmJG000 service=query query="CREATE RETENTION POLICY \"10d\" ON senseops DURATION 10d REPLICATION 1 DEFAULT"influxdb |[httpd] 172.24.0.2 - - [21/Aug/2022:18:13:43 +0000]"POST /query?p=&q=create+retention+policy+%2210d%22+on+%22senseops%22+duration+10d+replication+1+default&u= HTTP/1.1 "20033"-""-" fd91ac84-217c-11ed-8003-0242ac180003 2299butler-sos | 2022-08-21T18:13:43.242Z info: CONFIG: Created new InfluxDB retention policy: 10d
butler-sos | 2022-08-21T18:13:43.391Z info: --------------------------------------
butler-sos | 2022-08-21T18:13:43.391Z info: Starting Butler SOS
butler-sos | 2022-08-21T18:13:43.392Z info: Log level: verbose
butler-sos | 2022-08-21T18:13:43.393Z info: App version: 9.2.0
butler-sos | 2022-08-21T18:13:43.394Z info: Instance ID : 964cbd0a36bc....
butler-sos | 2022-08-21T18:13:43.394Z info:
butler-sos | 2022-08-21T18:13:43.395Z info: Node version : v18.7.0
butler-sos | 2022-08-21T18:13:43.396Z info: Architecture : x64
butler-sos | 2022-08-21T18:13:43.396Z info: Platform : linux
butler-sos | 2022-08-21T18:13:43.396Z info: Release : 11butler-sos | 2022-08-21T18:13:43.397Z info: Distro : Debian GNU/Linux
butler-sos | 2022-08-21T18:13:43.397Z info: Codename : bullseye
butler-sos | 2022-08-21T18:13:43.398Z info: Virtual : falsebutler-sos | 2022-08-21T18:13:43.398Z info: Processors : 4butler-sos | 2022-08-21T18:13:43.399Z info: Physical cores : 4butler-sos | 2022-08-21T18:13:43.399Z info: Cores : 4butler-sos | 2022-08-21T18:13:43.400Z info: Docker arch. : undefined
butler-sos | 2022-08-21T18:13:43.400Z info: Total memory : 6233055232butler-sos | 2022-08-21T18:13:43.401Z info: Standalone app : falsebutler-sos | 2022-08-21T18:13:43.401Z info: --------------------------------------
butler-sos | 2022-08-21T18:13:43.402Z info: Client cert: /nodeapp/config/certificate/client.pem
butler-sos | 2022-08-21T18:13:43.402Z info: Client cert key: /nodeapp/config/certificate/client_key.pem
butler-sos | 2022-08-21T18:13:43.402Z info: CA cert: /nodeapp/config/certificate/root.pem
butler-sos | 2022-08-21T18:13:43.421Z verbose: MAIN: Anonymous telemetry reporting has been set up.
butler-sos | 2022-08-21T18:13:43.423Z verbose: MAIN: Starting Docker healthcheck server...
butler-sos | 2022-08-21T18:13:43.428Z info: USER EVENT: UDP server listening on 0.0.0.0:9997
butler-sos | 2022-08-21T18:13:43.429Z info: LOG EVENT: UDP server listening on 0.0.0.0:9996
butler-sos | 2022-08-21T18:13:43.461Z info: MAIN: Started Docker healthcheck server on port 12398.
butler-sos | 2022-08-21T18:13:43.462Z info: MAIN: Starting Prometheus Butler SOS endpoint on 0.0.0.0:9842.
butler-sos | 2022-08-21T18:13:43.464Z verbose: PROM: Setting up Prometheus client for server: sense1
butler-sos | 2022-08-21T18:13:43.465Z verbose: PROM: Setting up Prometheus client for server: sense2
butler-sos | 2022-08-21T18:13:43.482Z info: PROM: Prometheus Butler SOS metrics server now listening on port 9842butler-sos | 2022-08-21T18:13:43.483Z info: PROM: Prometheus Node.js metrics server now listening on port 0.0.0.0:9001
butler-sos | 2022-08-21T18:13:45.080Z verbose: --------------------------------
butler-sos | 2022-08-21T18:13:45.081Z verbose: Iteration # 1, Uptime: 0 months, 0 days, 0 hours, 0 minutes, 2.007 seconds, Heap used 31.56 MB of total heap 60.81 MB. External (off-heap): 2.98 MB. Memory allocated to process: 102.28 MB.influxdb |[httpd] 172.24.0.2 - - [21/Aug/2022:18:13:45 +0000]"POST /write?db=senseops&p=&precision=n&rp=&u= HTTP/1.1 "2040"-""-" feaf181f-217c-11ed-8004-0242ac180003 44267butler-sos | 2022-08-21T18:13:45.137Z verbose: MEMORY USAGE INFLUXDB: Sent Butler SOS memory usage data to InfluxDB
butler-sos | 2022-08-21T18:13:45.198Z verbose: UPTIME NEW RELIC: Sent Butler SOS memory usage data to New Relic account 123456789("Ptarmigan Labs NR account")...
...
From a separate shell we can then ensure that the expected Docker containers are running:
➜  ~ docker ps
CONTAINER ID   IMAGE                             COMMAND                  CREATED              STATUS                        PORTS                                            NAMES
2311d17d1285   ptarmiganlabs/butler-sos:latest   "docker-entrypoint.s…"   About a minute ago   Up About a minute (healthy)                                                    butler-sos
a22307d12263   influxdb:1.8.10                   "/entrypoint.sh infl…"   About a minute ago   Up About a minute             0.0.0.0:8082->8082/tcp, 0.0.0.0:8086->8086/tcp   influxdb
81df665545d0   grafana/grafana:latest            "/run.sh"                About a minute ago   Up About a minute             0.0.0.0:3000->3000/tcp                           grafana
➜  ~
That’s great, we now have a single command (docker-compose -f docker-compose_fullstack_influxdb.yml up -d for background/daemon mode) to bring up all the tools needed to monitor a Qlik Sense cluster!
Now, let’s see if any data has arrived in InfluxDB.
Let’s check this by going into Grafana, which is available on port 3000.
First time logging into a new Grafana instance you can use the default admin account (username=admin, password=admin).
You will be asked to change that password during first login.
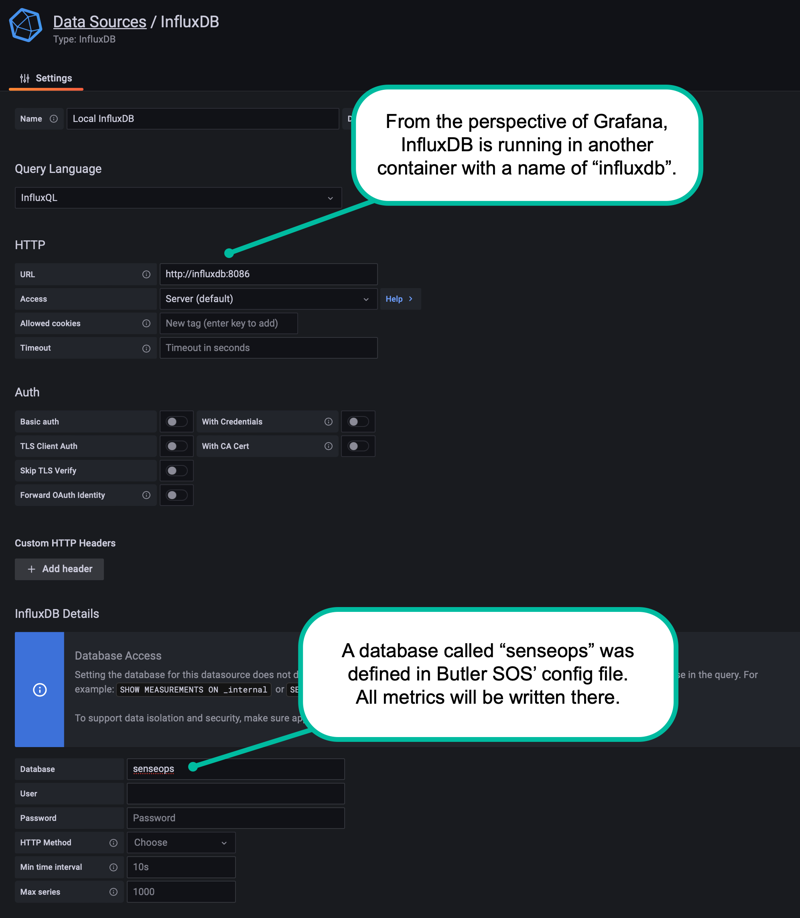
First add a data source in Grafana, pointing it to the local InfluxDB server.
Adding an InfluxDB data source in Grafana
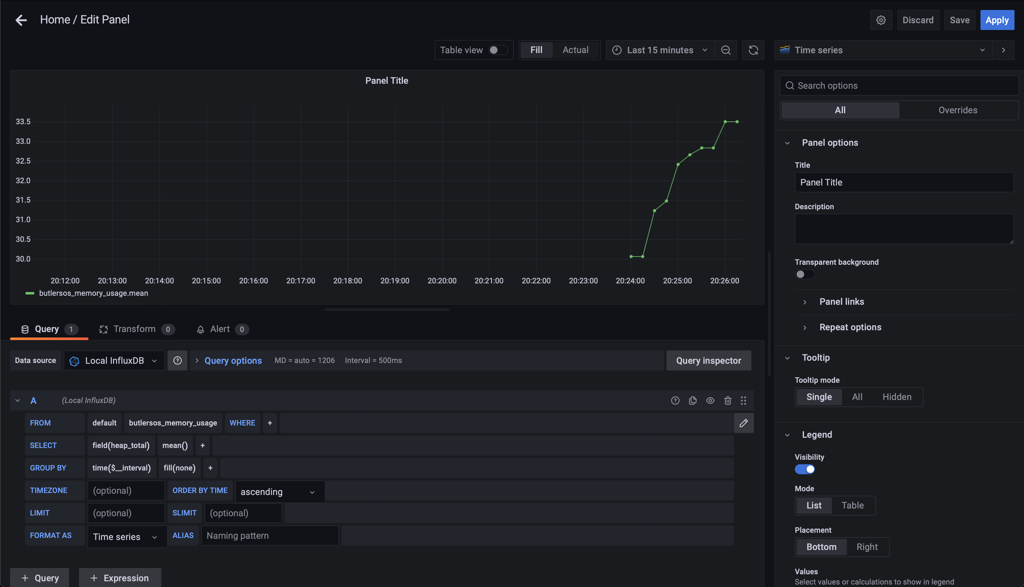
Now we can create a basic chart in Grafana, showing for example Butler SOS’ own memory usage.
After a while we should see some data in the chart:
Butler SOS' own memory usage, stored in InfluxDB and visualized in Grafana
Need to stop the entire stack of tools?
Easy - just run docker-compose -f docker-compose_fullstack_influxdb.yml down:
How to use Butler SOS with Prometheus and Grafana using Docker.
Warning
Work in progress
While Butler SOS’ Prometheus support is functional and works well, this documentation page is not yet complete.
Info
Prometheus is extremely powerful and flexible.
In fact, it’s probably the closest thing there is to a de facto standard for monitoring large scale software systems today.
No matter if you run Kubernetes cluster spanning multiple data centers and continents, or just a single Butler SOS instance - Prometheus is an excellent choice for monitoring of operational metrics.
That power and flexibility also means it can be challenging to set up Prometheus.
Usually it’s not that difficult, but if you’re new to Docker and has no previous experience with monitoring tools, using InfluxDB is usually a bit easier.
Or view it as a chance to learn more about one of the absolute stars of open source software - Prometheus is awesome!
This page assumes you don’t already have Prometheus and Grafana running.
If you already have access to those tools you can of course instead configure them to work with Butler SOS.
Running in Docker using docker-compose
The easiest way to get started is to run these tools in Docker containers, controlled by docker-compose files.
Running them under Kubernetes will give you a whole other level of fault tolerance, scalability etc - but this also requires much more when it comes to Kubernetes skills.
Use the setup that’s relevant to your use case.
You can use a single docker-compose file for Butler SOS, Prometheus and Grafana - or separate docker-compose files for each tool.
The advantage of using a single docker-compose file is that the entire stack of tools will be launched in unison. You can create dependencies between the tools if needed etc - very convenient.
On the other hand, having separate docker-compose files makes it easier to restart (or upgrade or in other ways change) a single service without affecting other services.
Full stack docker-compose file
Let’s start Butler SOS, Prometheus and Grafana from a single docker-compose_fullstack_prometheus.yml file:
Assuming you’ve already completed the setup of Butler SOS, the result of running the docker-compose_fullstack_prometheus.yml file above is something like this:
...
...
From a separate shell we can then ensure that the expected Docker containers are running:
➜ docker ps
CONTAINER ID   IMAGE                             COMMAND                  CREATED         STATUS                            PORTS                                                                                  NAMES
➜
That’s great, you now have a single command (docker-compose -f docker-compose_fullstack_influxdb.yml up -d for background/daemon mode) to bring up all the tools needed to monitor a Qlik Sense cluster!
Need to stop the entire stack of tools?
Easy - just run docker-compose -f docker-compose_fullstack_influxdb.yml down:
➜ docker-compose -f docker-compose_fullstack_influxdb.yml down
➜